How to Approve or Reject Benefits Enrollments
How to approve or decline an employee’s benefits enrollment, navigating through the confirmation reports page, and receiving enrollment notifications.
OVERVIEW
When employees submit benefits enrollments or changes to their plans stemming from a Qualifying Life Events, a Confirmation Report is created. Confirmation Reports serve as a record of the event, and provide your administrative team with a quality check to ensure the enrollment is appropriate.
Benefits enrollments are not processed in Namely until the associated Confirmation Report is reviewed and approved by a member of your administrative team, unless your Life Event is set up to auto-confirm.
TIP:
We recommend requiring confirmation report approval for your life events, but if you'd like your enrollments to auto-confirm, read: Auto-Confirm Enrollments Process Guide.
Confirmation Reports, with the exception of Open Enrollment, are managed in Enrollment Setup > Confirmation Reports in Namely Payroll. Open Enrollment confirmation reports are managed on the Open Enrollment Dashboard.
Refer to this video: https://vimeo.com/429701917/3d5c5c6927
ENROLLMENT NOTIFICATIONS
Namely sends email notifications to a specified group of administrators when an employee submits an enrollment or changes to their plans, so that they can review and approve the confirmation report.
You can manage the recipients of these notifications by following these steps:
-
Go to Enrollment Setup > Configuration > General.
-
Enter the email addresses of anyone you want to receive notifications, separated by semicolons, under Email Enroll Confirmation Notice.
-
Click Save.
CONFIRMATION REPORTS PAGE
Your Confirmation Reports are available for review in Enrollment Setup > Confirmation Reports in Namely Payroll. You can filter your Confirmation Reports by a number of criteria.
Filter Criteria
-
Creation date range
-
Life Event
-
Branch
-
Status
Statuses
-
Incomplete: Enrollments that have been started, but not submitted.
-
Confirmed: Confirmed enrollments. Click View under the Confirmation Report column to view enrollments that were processed.
-
Pending: These are enrollments that require review - they have been submitted by an employee but have not yet been approved or rejected.
-
Rejected: Rejected enrollment changes. You are unable to view enrollment reports for this status.
Once you've applied your search criteria and status, click Search to view your Confirmation Reports.
TIP:
We're aware of reports of administrators who are taken to a blank page when they try to view a confirmation report. This is a browser issue - clearing your cache and cookies will resolve it!
APPROVE OR REJECT ENROLLMENTS
After an employee submits an election, it must be approved by an administrator for the benefit and corresponding deduction to appear on the employee’s profile and be processed by the carrier.
To approve (or reject) a benefit election:
-
Go to Enrollment Setup > Confirmation Reports.
-
Select Pending.
-
Adjust the date range if necessary.
-
-
Click Search to refresh the results.
-
Confirm the Event Name and Event Date are correct.
-
For example, if the employee is a new hire, the Event Name might be “New Hire”, and the Event Date should be the date their coverage is effective based on your waiting period. If either are incorrect, submit a case in the Help Community before approving the enrollment.
-
-
Click View to review the elected benefits and ensure the changes match the life event.
-
If the election requires an EOI, be sure to follow up with the employee to receive the EOI and make the appropriate updates in Namely once the EOI has been approved or denied.
-
-
Select the checkbox next to the employee whose benefits you wish to approve.
-
Select Confirmed from the Status dropdown.
-
Click Update Selected.
If you'd like to reject the enrollment - select Reject instead of Confirmed for Step 7.
You can't undo a confirmation or rejection—either submit another enrollment or do a manual adjustment to correct any errors.

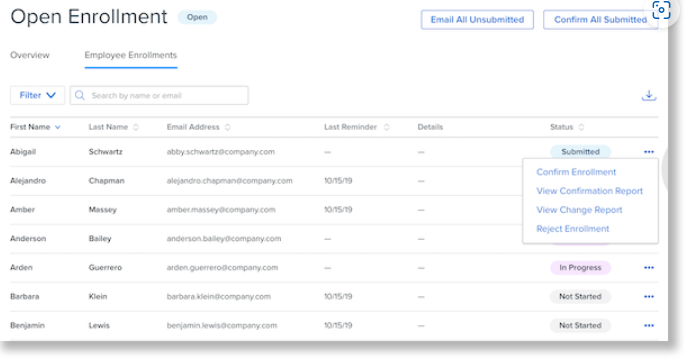
MANAGE ENROLLMENTS
Elections made during Open Enrollment are approved or rejected from the Open Enrollment Dashboard. To view your pending Open Enrollment elections:
-
From your Namely homepage, click Manage Benefits > Open Enrollment.
-
Click the Employee Enrollments tab, or click View Enrollments from the Employee Enrollment Status chart, to view and manage your employee's enrollments.
Bulk Actions—Confirm Enrollments
-
Click Confirm All Enrollments to bulk confirm all enrollments with the status Submitted. A modal will ask you to confirm that you want to confirm all submitted enrollments. Click Yes to proceed.
-
Any enrollments that do not contain errors will display a status of Confirmed and the Details column will display the date on which the employee was confirmed. You can hover over the information icon to see by whom they were approved.
-
Once confirmed, all elections will be applied and become viewable in Payroll.
-
If there are errors with any employee enrollments, an error banner will display the number of employees who received the error. The Details column will display a red View icon, which can be clicked to view the specific error.
-
Any enrollments that did not contain an error will be approved.
Individual Actions—Enroll, Reset, Reject, and Confirm
Click the menu icon (the three dots) next to an employee’s enrollment to manage that individual enrollment.
-
Select Enroll to enroll on behalf of the employee or test the environment before it is opened to all employees. This action will only display when the enrollment is in the Not Started or In Progress statuses.
-
Select Reset to wipe out any In Progress enrollments and require the employee to start their enrollment over. This option will only display when an enrollment is in the In Progress status. Once selected, the enrollment will return to the Not Started status.
-
Note: Selecting Reset will wipe out any elections that are in progress—not only ones related to Open Enrollment life events.
-
-
Click Reject to reject a submitted enrollment. Rejected enrollments will return to the In Progress status, and the Details column will include a note with the date the enrollment was rejected. Hover over the info icon to see who rejected the enrollment and at what time. The employee will have the option to edit their enrollment or restart it from scratch. Once the enrollment has been resubmitted, any notes in the details column about the rejection will be removed.
-
Click View Confirmation Report and View Change Report to view the details of a submitted enrollment.
-
Click Confirm to confirm a submitted enrollment. The enrollment’s status will change to Confirmed and the details column will display the confirmation date. Hover over the info icon to see who confirmed it.